At Climapulse we try to make our software so that it is right for 99% of the cases. The fewer choices you as a user have to make during interventions, the better. But sometimes there is no escape and you have to make a choice yourself.
For an explanation of all the options, you can take a look at the tab Configuration.
Here you will find settings divided into eight subfolders:

General
These are the personalized settings that will affect your Climapulse account:

A personalized application URL for your business, which can only consist of letters, numbers, hyphens, and underscores.
2. Standard language
This is the language that will be used for system messages in your Climapulse account. This can be changed at any time.
Commands and actions

1. Initial status of orders
When creating a work order, you have the option to automatically set the status to one of the following options:
- Still to be completed: This allows you to prepare work orders in advance, so that you only have to add the details. Work orders that still have to be completed are also displayed in your task list and scheduled for the coming days.
- Completed: The work order has been fully completed and, if this status is applied, will be included in the digital logbook.
- Completed, but follow-up required: The work order has been fully completed and will be included in the digital logbook, but this status serves as a reminder that follow-up action is still required. This can vary from a check to adding internal attachments at the office.
2. Limit technician view of tasks
3. Number of visible days for future tasks.
Make all company materials visible to technicians while creating a new work order. Or, choose to show only their own materials.
5. Numbering orders
Climapulse can automatically assign a unique order number. The number of an order can then no longer be changed manually. The reference can be used to provide the order with its own number or code
6. Next order number
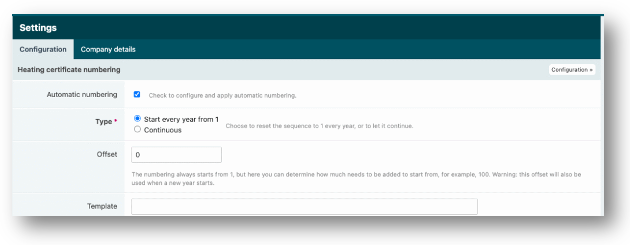
7. Numbering certificates
When you register leak and pressure tests in Climapulse, you have the option to have Climapulse automatically assign a number, or to add a unique number yourself.
8. Next reference certificates
The number that will be used for the next leak or pressure test. If you want to use automatic numbering, this must be an integer greater than or equal to 1.
9. Numbering heating certificates sten
10. BCC e-mail addresses
If you use the functionality to send certificates and work orders to the customer via Climapulse Service, you can determine here which e-mail addresses should always receive a copy. This way, you not only have a confirmation that everything has been sent, you can also immediately create the invoice, so to speak!
11. Allow signing and sending documents
Determine whether and when the certificates and work orders of an assignment may be signed and sent.
12. Formatting notes
You can enable or disable the use of Markdown in the section Assignments and actions.
Markdown will only be available in assignments that are created afterwards. To prevent the notes of old assignments from getting random formatting, they are set to “normal text”.
13. Email templates
The email messages when sending the documents of an assignment also support templates. Use this as a supplement to note templates or simply adjust the default template to your wishes, for example to always include a link to your conditions. Existing templates can also be imported or exported.
14. Note templates
A major responsibility of installation companies is to inform customers when there are problems with their installation, both technically and legally. Thanks to the note templates for assignments, you can provide fixed texts that technicians can then use when necessary. This information also becomes an integral part of the logbook. Existing templates can also be imported or exported.
Some examples:
- Create a template that invites the customer to make a follow-up appointment with the office.
- Inform the customer that the installation does not meet the legal requirements and that it must be put in order.
15. Labels
The use of labels makes it possible to label/tag/mark installations, customers or orders. This can be because of a status, characteristic or other matters that require attention.
By assigning a label to a customer, location, installation or order, you can more easily filter it from the full overview.
Time and Material
Configure the operation of time registration, materials and other costs within new orders.

1. Time registration
entry
You can choose from two different options for entering time registrations:
- Duration: The exact number of hours is entered. For example 1:30.
- Start and end time: Hours are registered via start and end time. Duration is calculated by Climapulse.
Display
- Exact: The exact duration is shown. For example 14:30.
- Completed: Each time registration is completed.
- Start and end time: The start and end time are shown.
Activities
2. Material
3. Measuring instrument
4. Extra options
You can choose to enable or disable extra fields, such as distance, travel time and/or fixed compensation.
Refrigerants
As an administrator, you can decide for yourself whether mechanics will check their refrigerant cylinders in and out themselves. This way you can easily check with a Track & Trace what all cylinders have been used for.
Installations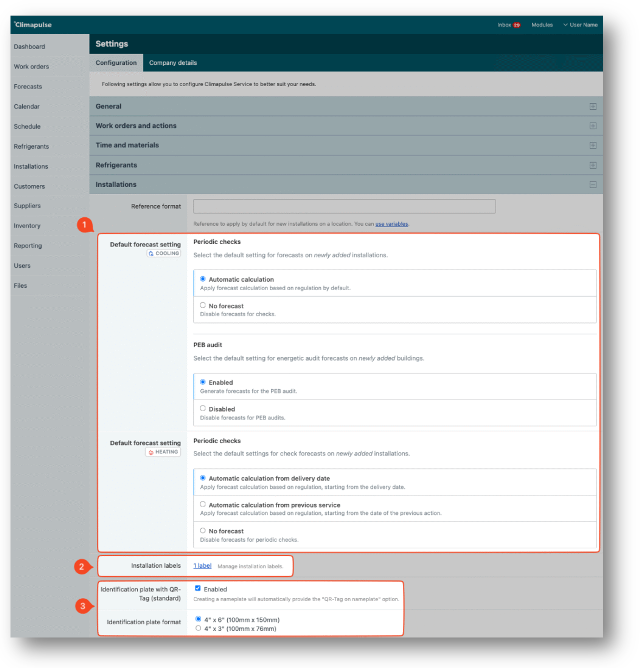
1. Default forecast settings
For both cooling and heating installations, you can determine which forecast settings should be applied by default when adding an installation. If you do almost exclusively installation, it is best to disable the forecasts by default. When registering the installation, you can always adjust this if necessary.
Please note: this setting is only important for installations that you add afterwards. The settings of existing installations are not changed.
2. Installation labels
You can create or delete labels for installations. When creating these labels, you can choose who these labels are visible to and who can manage them. You also have the option to make the label available for the work orders.
3. License plate with QR tag
Customers, locations and buildings
You can create or delete labels for customers and locations. When creating these labels, you can choose who these labels are visible to and who can manage them. You also have the option to make the label available for the work orders.
Notifications
How many months in advance you want to be notified of the expiration of certificates of technicians and companies, you can set here.
Documents
Here you choose the theme you want to use for your certificates and work orders. Click on the images to view an example. The theme will be applied to all documents, except of course the signed versions.